Installing your SSL Server Certificate - Microsoft IIS 5.x / 6.x
You will receive an email from the Registration Authority when your certificate request
has been approved that contains a link to a location where your certificate may be
obtained. Clicking on this link will bring up a browser window that contains the
details of your issued certificate and includes a section that looks something like the
following:
-----BEGIN CERTIFICATE-----
MIAGCSqGSIb3DQEHAqCAMIACAQExADALBgkqhkiG9w0BBwGggDCCAmowggHXAhAF
UbM77e50M63v1Z2A/5O5MA0GCSqGSIb3DQEOBAUAMF8xCzAJBgNVBAYTAlVTMSAw
(.......)
E+cFEpf0WForA+eRP6XraWw8rTN8102zGrcJgg4P6XVS4l39+l5aCEGGbauLP5W6
K99c42ku3QrlX2+KeDi+xBG2cEIsdSiXeQS/16S36ITclu4AADEAAAAAAAAA
-----END CERTIFICATE-----
Copy everything you see between and including the lines that look like
-----BEGIN CERTIFICATE-----
and
-----END CERTIFICATE-----
and paste it into an appropriately named text file e.g. myserver.cert
1. Installing the Root & Intermediate Certificates:
Firstly, you need to download the CA certificates (both Root CA certificate and Issuing
CA certificate) as individual files
To install these certificates, you must first enable the Certificates Snap-in for the
Microsoft Management Console (mmc)
- Click the Start Button then selct Run and type mmc
- Click File and select Add/Remove Snap in
- Select Add, select Certificates from the Add
Standalone Snap-in box and click Add
- Select Computer Account and click Next
- Select Local Computer and click Finish
- Close the Add Standalone Snap-in box, click OK
in the Add/Remove Snap in
- Return to the MMC
To install the Root CA Certificate, we use this snap-in:
- Right click the Trusted Root Certification Authorities, select All
Tasks, select Import.
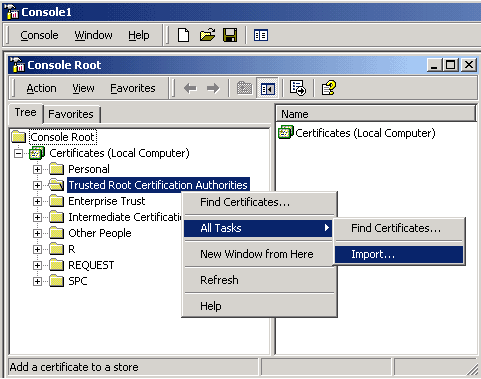
This starts the certificate import wizard
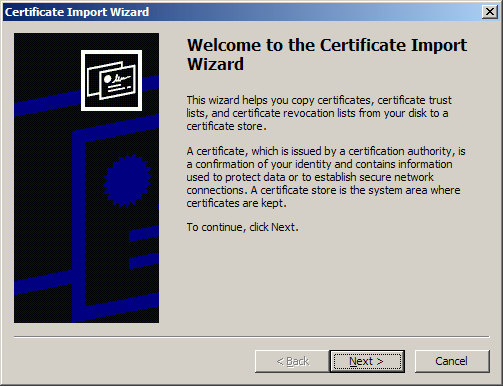
Click Next.
- The File to Import dialog is shown
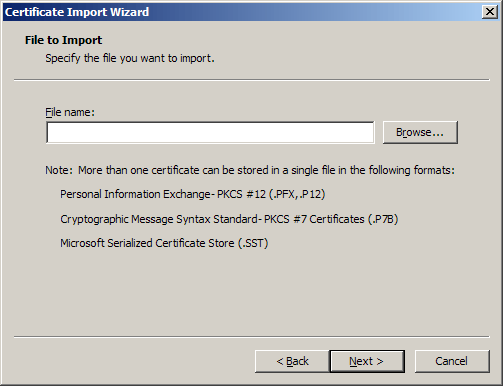
Locate the Root CA Certificate file you downloaded earlier and click Next.
- When the wizard is completed, click Finish.
To install the Issuing CA Certificate:
- Right click the Intermediate Certification Authorities, select All
Tasks, select Import.
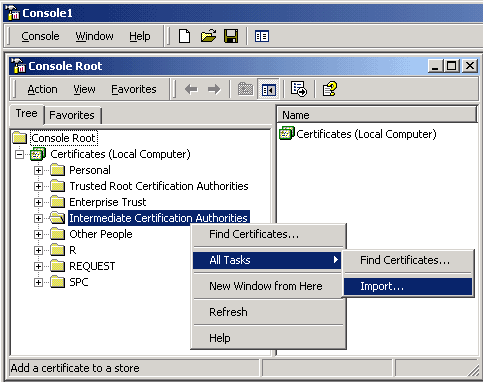
- Complete the import wizard again, but this time locating the Issuing CA
Certificate when prompted for the Certificate file.
When both certificates have been installed:
- Ensure that the Root CA certificate appears under Trusted Root
Certification Authorities
- Ensure that the Issuing CA certificate appears under Intermediate
Certification Authorities
Installing your IIS SSL Certificate:
- Select Administrative Tools
- Start Internet Services Manager
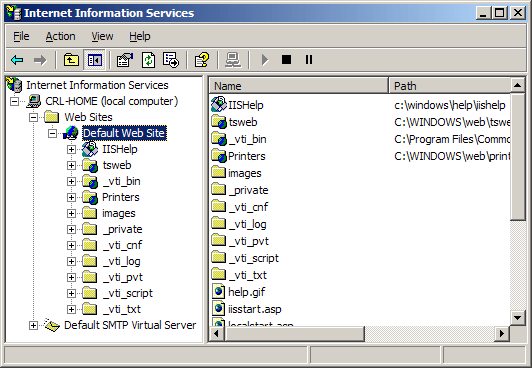
- Open the properties window for the website. You can do this by right clicking on the
Default Website and selecting Properties from the menu.
- Open Directory Security by right clicking on the Directory Security tab
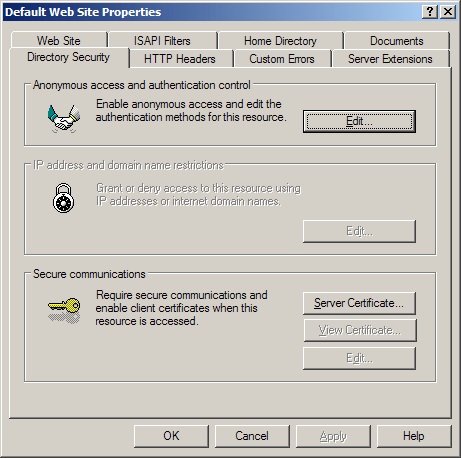
- Click Server Certificate. The following Wizard will appear:
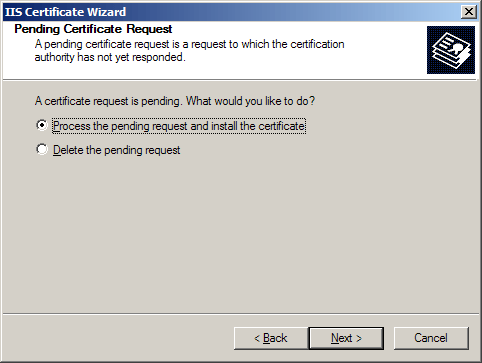
- Choose to Process the Pending Request and Install
the Certificate. Click Next.
- Enter the location of your IIS SSL certificate that you obtained earlier (e.g.
myserver.crt)
(you may also browse to locate your IIS SSL certificate), and then click Next.
- Read the summary screen to be sure that you are processing the correct certificate, and
then click Next.
- You will see a confirmation screen. When you have read this information, click Next.
- You now have an IIS SSL server certificate installed.
Important: You must now restart the computer to complete the install
You may want to test the Web site to ensure that everything is working correctly. Be
sure to use when you test connectivity to the site.
Copyright © Trustis Limited 2010. All
Rights Reserved
This document is licensed for use only in conjunction with the use of Trustis Trust
Services


